United Earth for Peace

Seeking Ways to Improve the Human Condition

Announcements:

We are in the process of creating a mobile (traveling)  platform to demonstrate the potential of independent living without being connected to the grid.

We do not need to be dependent on 120 volt technology as power companies would have you believe.

Aside from having all the major modern conveniences,  we are hoping to have an atmospheric water generator to  supply  a continuous source of drinking water. 


You can help support us by purchasing one of our Exclusive Posters and other products from our Company Store

Solutions - Clean Drinking Water 

We are all about finding ways to improve the quality of life for all of humanity. First and foremost, we are trying to clothe the naked, house the homeless, feed the hungry, heal the sick and educate the uneducated.

Creating Safe Drinking Water

Water is essential for life to exist. Here we will present ideas for capturing, and purifying water for human consumption under various conditions.

Water pollution, by the discharge of wastewater from commercial and industrial waste (intentionally or through spills) into surface waters; discharges of untreated domestic sewage, and chemical contaminants, such as chlorine, from treated sewage; release of waste and contaminants into surface runoff flowing to surface waters (including urban runoff and agricultural runoff, which may contain chemical fertilizers and pesticides; also including human feces from open defecation - still a major problem in many developing countries); groundwater pollution from waste disposal and leaching into the ground, including from pit latrines and septic tanks; eutrophication and littering.

Water problems affect half of humanity. Some 1.1 billion people in developing countries have inadequate access to water. Almost two in three people lacking access to clean water survive on less than $2 a day, with one in three living on less than $1 a day. Access to piped water into the household averages about 85% for the wealthiest 20% of the population, compared with 25% for the poorest 20%. 1.8 billion people who have access to a water source within 1 kilometer, but not in their house or yard, consume around 20 liters per day.

A mere 12 percent of the world’s population uses 85 percent of its water, and these 12 percent do not live in the Third World.

Basic Sand Filter Designs

Sand filters are a simple, effective way to purify water or treat wastewater by using layers of sand and gravel to trap impurities. Below, I’ll outline some basic sand filter designs, their components, and how they work. These designs are commonly used in applications like water purification, aquariums, swimming pools, or small-scale wastewater treatment.

1. Slow Sand Filter
Description: One of the oldest and simplest designs, relying on gravity and biological processes.
Components:
Container: A tank or barrel (concrete, plastic, or metal).
Filter Media:
Top layer: Fine sand (0.15–0.35 mm grain size, ~20–50 cm deep).
Middle layer: Coarse sand or fine gravel (optional transition layer).
Bottom layer: Gravel (5–25 mm, ~10–20 cm deep) for drainage.
Schmutzdecke: A biological layer that forms on top of the sand over time, enhancing filtration.
Outlet: A pipe or perforated drain at the bottom to collect filtered water.
Inlet: A diffuser or splash plate to prevent disturbing the sand.
How It Works:
Water flows slowly (0.1–0.4 m/hour) through the sand by gravity.
Physical straining and biological activity (microorganisms in the schmutzdecke) remove contaminants.
Pros: Low cost, low maintenance, effective for microbial removal.
Cons: Slow flow rate, requires periodic cleaning of the top layer.


2. Rapid Sand Filter
Description: A faster, mechanically driven design often used in larger systems.
Components:
Container: Typically a large concrete or steel tank.
Filter Media:
Top layer: Fine sand (0.4–1.0 mm, ~60–75 cm deep).
Middle layer: Coarse sand (~15 cm).
Bottom layer: Graded gravel (multiple layers, ~30–45 cm total).
Underdrain System: Perforated pipes or a false floor to collect water.
Backwash System: Pipes and pumps to reverse water flow for cleaning.
How It Works:
Water is pumped through at a higher rate (4–20 m/hour).
Physical filtration traps particles; chemical coagulants (e.g., alum) may be added to enhance performance.
Periodic backwashing clears clogged sand.
Pros: High flow rate, suitable for large volumes.
Cons: Requires energy, more complex maintenance.


3. DIY Bucket Sand Filter (Small-Scale)
Description: A portable, low-cost option for emergency water filtration.
Components:
Container: A 5-gallon bucket or similar with a lid.
Filter Media:
Top: Fine sand (~15–20 cm).
Middle: Coarse sand or small pebbles (~5–10 cm).
Bottom: Gravel (~5–10 cm).
Outlet: A spigot or drilled hole with a tube near the bottom.
Inlet: Pour water through the top (add a cloth or mesh to pre-filter debris).
How It Works:
Water percolates through the layers by gravity.
Sand traps sediment and some pathogens; gravel supports drainage.
Pros: Cheap, easy to build with common materials.
Cons: Limited capacity, less effective for heavy contamination without pretreatment (e.g., boiling).

General Design Tips
Layering: Always arrange media from fine (top) to coarse (bottom) to prevent clogging and ensure proper flow.
Flow Control: Use valves or elevation to regulate water speed, especially in slow sand filters.
Maintenance: Slow sand filters need surface scraping when flow slows; rapid filters need backwashing.
Pre-Filtration: Remove large debris with a screen or cloth before water enters the filter.

Simple Water Collection Designs

Simple water collection designs are practical ways to gather and store water, often for drinking, irrigation, or household use. These systems are typically low-cost, easy to build, and rely on natural sources like rainwater or surface runoff. Below are some basic designs, their components, and how they work.


1. Rainwater Harvesting with a Roof and Barrel
Description: Collects rainwater from a roof and stores it in a container.
Components:
Catchment Surface: A sloped roof (metal, tile, or plastic sheeting works best; avoid asphalt or lead-based materials).
Gutters: PVC or metal channels along the roof edge to direct water.
Downspout: A pipe connecting the gutter to storage.
Storage: A barrel, drum, or tank (e.g., 55-gallon drum) with a lid.
First Flush Filter: Optional pipe or diverter to discard initial dirty runoff.
Screen: Mesh over the inlet to block leaves and debris.
Tap/Spigot: Near the bottom of the storage for easy access.
How It Works:
Rain falls on the roof, flows into gutters, and is channeled into the storage container.
The first flush (if included) removes contaminants from the initial flow before clean water enters the tank.
Pros: Simple, scalable, uses existing structures.
Cons: Dependent on rainfall, requires regular cleaning to prevent contamination.

2. Ground Catchment with a Tarp or Sheet
Description: Uses a sloping surface to funnel water into a container.
Components:
Catchment Surface: A tarp, plastic sheet, or smooth concrete slab (~1–2 m² or larger).
Frame/Support: Stakes, poles, or rocks to elevate and slope the surface.
Collection Point: A bucket, jug, or shallow pit lined with plastic at the lowest end.
Pre-Filter: Gravel or cloth at the entry to remove debris.
How It Works:
Rainwater or runoff hits the sloped surface and flows downward into the collection point.
The pre-filter catches larger particles before storage.
Pros: Cheap, portable, easy to set up anywhere.
Cons: Small capacity, less effective in low-rain areas, needs frequent repositioning.

3. Surface Runoff Trap (Contour Trench or Swale)
Description: Captures water flowing over land, often for irrigation or groundwater recharge.
Components:
Trench: A shallow ditch (20–50 cm deep, 1–2 m wide) dug along a contour line on a slope.
Berm: A mound of soil on the downhill side to hold water.
Lining: Optional plastic or clay to reduce seepage (if storing water longer).
Overflow: A spillway or channel to direct excess water.
How It Works:
Runoff flows downhill, collects in the trench, and either soaks into the ground or is stored.
Excess water escapes via the overflow to prevent erosion.
Pros: Low-tech, great for landscapes, improves soil moisture.
Cons: Requires land with a slope, labor-intensive to dig, not ideal for drinking water without further treatment.

4. Fog Catcher (Mist Net)
Description: Collects water from fog or mist in arid, foggy regions.
Components:
Net: A fine mesh or netting (e.g., polypropylene, ~1–2 m high and wide).
Frame: Poles or a simple wooden/metal structure to hold the net upright.
Gutter: A trough or pipe at the base to catch dripping water.
Storage: A container connected to the gutter.
How It Works:
Fog passes through the net, water droplets condense on the mesh, and drip into the gutter below.
Water flows into storage for use.
Pros: Works in dry climates with fog, no energy required.
Cons: Limited to specific conditions, low yield compared to rain collection.

General Design Tips
Placement: Position collectors where water naturally flows or falls (e.g., under a roofline or on a slope).
Cleanliness: Use screens, filters, or first-flush systems to keep debris and contaminants out.
Storage: Cover containers to prevent evaporation and mosquito breeding; elevate them for gravity-fed access.
Materials: Opt for food-grade plastics or non-toxic materials if collecting drinking water.

Basic Solar Still Designs

Solar stills are simple devices that use solar energy to distill water, separating clean water from contaminants through evaporation and condensation. They’re great for purifying salty, brackish, or impure water in survival situations, arid regions, or off-grid setups. Below are some basic solar still designs, their components, and how they work.

1. Pit Solar Still (Ground-Based)
Description: A basic design dug into the ground to extract moisture from soil or purify water.
Components:
Pit: A hole (~1 m wide, 0.5 m deep) dug in the ground.
Contaminated Water/Source: A container of dirty water placed in the center, or moist soil/plants if extracting ambient moisture.
Cover: A clear plastic sheet (e.g., polyethylene) stretched over the pit.
Weight: A small rock or object placed in the center of the cover to create a low point.
Collection Cup: A clean container placed under the weight, inside the pit.
Seal: Rocks, sand, or soil around the edges to secure the plastic and trap vapor.
How It Works:
Sunlight heats the water or moist soil, causing evaporation.
Vapor rises, condenses on the cooler plastic sheet, and drips into the collection cup at the low point.
Pros: Simple, uses minimal materials, can extract water from damp soil or vegetation.
Cons: Low yield (0.5–1 liter/day), labor-intensive to dig, dependent on sunlight.

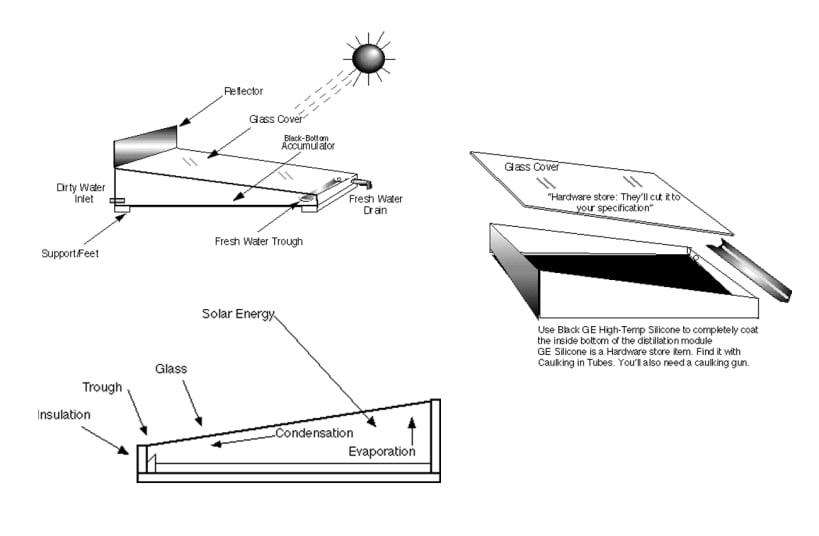
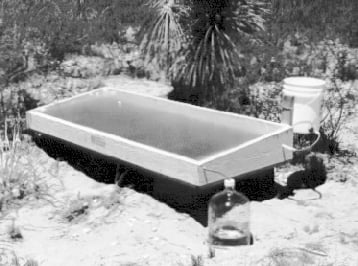
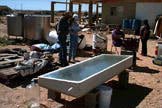
2. Box Solar Still (Single-Slope)
Description: A portable, above-ground still with a slanted glass top for efficient condensation.
Components:
Box: A shallow, watertight container (wood, metal, or plastic, ~1 m² area).
Base Lining: Black material (e.g., plastic or paint) to absorb heat.
Contaminated Water: Poured into the box (a thin layer, ~2–5 cm deep).
Lid: A clear glass or plastic pane, sloped at an angle (10–30°).
Seal: Weatherstripping or tape to make it airtight.
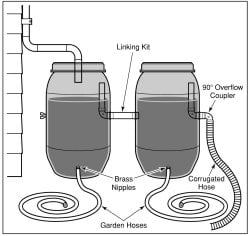
Collection Trough: A channel or gutter along the lower edge of the lid, leading to an external container.
How It Works:
Sunlight passes through the clear lid, heats the black base, and evaporates the water.
Vapor rises, condenses on the slanted lid, and runs down into the trough for collection.
Pros: Higher yield than pit stills (1–3 liters/day/m²), reusable, portable.
Cons: Requires construction, more materials, needs regular cleaning.

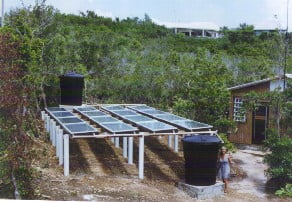
3. Double-Slope Solar Still
Description: A variation of the box still with a peaked lid for increased surface area.
Components:
Box: Similar to the single-slope, with a black-lined base.
Contaminated Water: Thin layer inside the box.
Lid: Two clear panels forming an "A" shape (e.g., glass or rigid plastic).
Seal: Airtight edges.
Collection Troughs: Two gutters, one along each lower edge of the lid, draining into containers.
How It Works:
Sunlight heats the water through both lid panels, evaporating it.
Vapor condenses on both slopes and flows into separate troughs.
Pros: Captures sunlight from multiple angles, slightly higher efficiency.
Cons: More complex to build, requires precise sealing.

4. Portable Cone Still (Bottle-Based)
Description: A small, improvised still using minimal materials for emergencies.
Components:
Base Container: A wide, shallow dish or cut-off plastic bottle with dirty water.
Cone Cover: A clear plastic bottle (top cut off) or plastic wrap shaped into a cone.
Seal: Tape or a tight fit to secure the cover.
Collection Point: Water drips to the center; a small cup can be added inside if using a dish.
How It Works:
Sunlight heats the water in the base, vapor rises, condenses on the cone, and drips to the center for collection.
Pros: Ultra-simple, uses scavenged materials, lightweight.
Cons: Very low yield (a few ounces/day), single-use unless rebuilt.

General Design Tips
Orientation: Face the still toward the sun (south in the Northern Hemisphere, north in the Southern) and tilt the lid to match your latitude for max efficiency.
Materials: Use clear, UV-resistant materials (glass or polycarbonate) for durability; avoid cloudy or scratched covers.
Heat Absorption: Black bases increase evaporation rates; avoid reflective surfaces.
Ventilation: Keep it sealed but avoid overpressure—small leaks won’t ruin it.
Yield Boosters: Add a thin metal sheet under the water to conduct heat, or pre-heat the water slightly.

Typical Output
Expect 0.5–3 liters/day per square meter, depending on sunlight, design, and water temperature. Hot, sunny conditions maximize production.